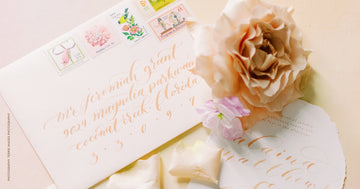
A full guide on wedding invitation addressing etiquette, envelope types, and mailing tips.
Envelopes are often just an afterthought when we mail out a letter, nothing more than a sleeve to protect the information inside. But when it comes to the most important mail of our lives – wedding invitations – envelopes and addressing etiquette should be given as much consideration as the contents.
After all, the envelope is what makes the first impression. Imagine opening your mailbox and flipping through the anonymous white rectangles and pizza flyers – and suddenly, one jumps out at you. It’s luxuriously thick, weighty and smooth, with your name and address beautifully written on it. Wouldn’t that immediately get your attention, and maybe even make your day?
If that’s the reaction you want to get from your guests when they receive your personalized invitation, it’s a must to invest in proper envelopes. Here’s our guide on envelope types, the proper etiquette to address wedding invitations, and mailing.
Envelope Types
You may have seen different envelope types on Pinterest, but the one we use at Hey Hunn is called the Euro-flap or pointed flap. The most elegant of all the envelope types, these feature a flap that tapers to a point, allowing it to be neatly sealed with wax.
There are two kinds of envelopes you’ll need for your wedding invitation suite: the main envelope and the RSVP envelope.
Main Envelopes
The main envelope holds everything in your wedding invitation suite. While A7 envelopes are the most common size, we’d recommend using the slightly larger Outer A7.5 (OA7) if you have embellishments that take up a little more room, such as a chiffon ribbon, vellum wraps, or thick duplexed cards. You want your guest to slide out the invitation suite smoothly, not have to wrestle it out. The OA7 size is also ideal for invitations on handmade or deckled paper, so that there’s enough room for the delicate edges.
RSVP Envelopes
Some brides collect their RSVPs digitally, but for those who prefer the tradition of having guests mail their RSVPs to you, you’ll need a 4-bar envelope (3 5/8” by 5 1/8”) included inside your invitation suite. This should be printed with your return address and stamped, so that all your guests have to do is fill in the RSVP card, seal it and pop it in the mail.
Printed or hand-calligraphed envelopes?
Both printed addresses and hand-calligraphed addresses have their benefits: printing is less expensive and you can still choose a script font, while hand calligraphy is far more unique and personal.
Calligraphy addressing on envelopes will always be slightly more expensive (from $3 per address) than printing, but you get that wonderful handmade touch that surprises and delights your guests the moment they open the mailbox. After all, handwritten notes and letters are so rare these days that they feel like a gift.
A question we often get is: do we need to include our return address as well? The answer is always yes, just in case your invitation gets lost. This part doesn’t have to be hand-calligraphed since it’s the same across all envelopes. Your calligrapher can write this once and digitize it for printing so that it’s consistent, and the same style can be used for printing the return address on your RSVP envelopes, too.
Factors to consider for calligraphy addressing
- Alignment. The default alignment for addressing is to the left, so if you’d like it centered, please let your calligrapher know. It’s generally a lot harder to get things perfectly centered by hand, so there may be an extra fee.
- Ink color. Your calligrapher may have a range of inks on hand and ask you to pick one, or suggest one that matches your invitation’s color palette. If you’d like a custom-blended shade, it usually costs a little more as the calligrapher needs to mix it up every time they address a batch of envelopes.
- Type of envelopes. Writing on rough surfaces can be tricky, even for the most seasoned of calligraphers. Typically, your stationer or calligrapher may suggest certain envelope types that are ideal for calligraphy addressing, but if you already have your own envelopes in mind, do check with them or send a sample to them first for testing.
Preparing your address list for your stationer or calligrapher
The first step is to get the addresses from your guests, which should happen as early on in the process as possible. This can be done by sending out a form using Postable or Mailbook, and the software will collate the addresses into a convenient spreadsheet. While setting up the form, don’t forget these important details:
- Your guests’ preferred salutations
- Full names
- Full addresses, including their unit number if applicable, zip code and country
- Their mobile number, in case you need to clarify any errors
- Which members of their household are attending
The last bit is important so you’ll know whether to address the invitation to a person, a couple or a family.
Finally, check the spreadsheet for any potential missing fields, and indicate the living situation in each household so your calligrapher will know how to address them according to the proper etiquette.
Addressing etiquette for wedding invitations
The proper etiquette for addressing wedding invitations has come a long way in modern times, but remains fairly formal. Here’s how to invite families and couples to your wedding depending on their household situation.
- Singles.This is pretty straightforward, with the person’s salutation and full name, e.g. Ms. Heather Williams.
-
Married couple. The usual standard is Mr. and Mrs, e.g. Mr. and Mrs. Marcus Johnson.
In the event that one of them holds a title such as Dr. or military rank like Lieutenant, they should be addressed as such, with the person holding the title first, e.g. Dr. Jane Clayton and Mr. Jonathan Swift. Addressing etiquette dictates that in the event the woman has kept her maiden name, hers should come first: Ms. Eva Smith and Mr. Terry Hart.
- Couple living together but not married. Each has their full name, with the woman’s first, e.g. Ms. Christine Marshall (and) Mr. Michael Jones. For etiquette, their names should be listed on two separate lines.
- Family with children under 18. The invitation should be addressed to only the adult couple.
- Family with children above 18. According to traditional addressing etiquette, each child over 18 should receive their own invitation. If you’d prefer a more casual approach, you can address it to the family instead, e.g. The Swift family.
- Siblings living together. The proper way to address it is to have the oldest sibling’s name listed first.
The proper way to write addresses
All addresses should have the following, in order:
- Title, first name, last name
- Street address (avoid abbreviations)
- City, state
- Zip code
Most people will abbreviate their addresses (e.g. Street to St). When you collect addresses, be sure to have an instruction asking them to write out their street names and numbers under 100 in full, such as 1234 East Twenty-fifth Street instead of 1234 E. 25th St. Apart from etiquette, it also helps to clarify things and reduce possible mailing errors.
For some areas, e.g. South Florida and New York City, the United States Postal Service prefers numbered streets to be written numerically instead of being spelled out. If you’re mailing to these areas, please keep numerical addresses and directional abbreviations (N, NW, etc.), as well as numerals for apartment numbers (e.g. Unit 85D).
Note: It’s essential that you check all addresses prior to sending the list to your calligrapher, as the calligrapher will not be liable for any errors that are in the list.
On envelope extras
As a rule of thumb, always order at least 15% extra envelopes, so if you’re preparing 100 invitations you should have 15 extra. This is in case of two things:
- Human error on the calligrapher’s part. As with anything handmade, imperfections occur: ink blobs, a mis-written number, etc.
- Last-minute additions to the guest list. Almost every wedding has them!
Whose return address should be on the envelope?
It can be either the bride or groom’s return address, or even a parent, as long as this is discussed beforehand. The return address should be the same as the one on the RSVP envelope. It doesn’t have to have a name – just the address – but you can have it there if you prefer.
Mailing your envelopes
After your envelopes have been addressed, and if you’re the one doing the mailing, always get your envelope weighed at the post office. Those with wax seals, gatefolds, and other embellishments may weigh more than the average card, so be sure to check the postage rates! Acrylic wedding invitations in particular may be charged at a parcel rate, so it’s good to factor in the postage costs when determining your budget for invitations.
Take a complete invitation suite (embellishments, calligraphy, envelope and all – these things add weight) with you to be weighed. We’d recommend checking a few post offices, and asking their rates and the possibility of hand-cancellation, then selecting one for mailing all your invitations.
The importance of hand-cancellation
Most mail gets routed through a machine, which does the job of reading addresses and sorting them. However, you don’t want that for your custom wedding invitations. We recommend always asking for hand-cancellation to ensure the invitations arrive on time on your guest’s doorstep and are received in perfect condition.
In the hand-cancellation process, a postal worker reviews and handles the envelope. Since a human being can read calligraphy or metallic ink much better than a machine, this facilitates timely delivery for your invitations. It also ensures your invitations are handled carefully, so delicate embellishments like bow knots and wax seals remain intact.
If you'd like to get your envelopes addressed, let us know and we'll be happy to explore how we can work together. Our team at Hey Hunn can help guide you through the addressing process step by step, ensuring you have beautiful envelopes and invitations to herald the happiest day of your life.


